Maintaining a lush and healthy lawn is the dream of every homeowner. However, over time, lawns can become worn out, patchy, and infested with weeds, making it necessary to remove old sod and replant. By taking the right steps, you can transform your tired lawn into a vibrant oasis of greenery. We’ll show you how to remove old sod and replant to make sure your work lasts.
Removing old sod is not only about aesthetic appeal but also about the health and vitality of your lawn. Over the years, sod can accumulate thatch, which is a layer of debris, dead grass and roots that blocks water, air, and nutrients from reaching the soil. Additionally, old sod may harbor weed seeds or diseases that can hinder new grass growth. Properly removing the old sod creates a clean slate for fresh, healthy grass to flourish.
Throughout this article, we will explore step-by-step techniques for removing old sod and replanting, while also incorporating lawn-friendly practices to ensure your lawn restoration journey is visible and accessible to others seeking similar guidance.
Whether you’ve been gardening for a while or are new to lawn care, this article will assist you with the knowledge to tackle the task of removing old sod and replanting with confidence. So, let’s dive into the process and uncover the secrets to rejuvenating your lawn for years of enjoyment and admiration.
Assessing the Need to Remove Old Sod
Before embarking on the journey of removing old sod, it is crucial to assess whether it is necessary for your lawn. While removing old sod can be beneficial for most lawns, there are instances where alternative solutions might suffice. Here, we will discuss the signs indicating the need to remove old sod and provide insights into assessing your lawn’s condition.
A. Signs indicating the need to remove old sod:
- Thatch buildup: Excessive thatch accumulation can create a barrier, preventing water, air, and nutrients from reaching the soil and grassroots. If the thatch on your lawn is particularly thick, it’s a clear sign that the old sod needs to be removed.
- Weed infestation: If your lawn is overrun with weeds that resist control measures, it may be an indication of a compromised sod layer. Removing the old sod can eliminate weed seeds and roots, reducing future weed problems.
- Poor grass health: If your grass appears weak, discolored, or struggles to grow despite proper care, it may be a result of underlying issues in the old sod. Removing it will allow you to address these problems and start fresh with healthier grass.
B. Assessing the lawn’s condition:
- Visual inspection: Closely look at your lawn to identify any obvious signs of thatch buildup, weed infiltration, or grass health issues. Walk across the lawn and note any areas that feel spongy, discolored, or have patchy growth.
- Conduct a soil test: Use a soil testing kit or consult a local extension office to evaluate the soil’s pH level, nutrient content, and overall health. This will help determine if the underlying soil contributes to the lawn’s problems or is primarily the old sod.
- Seek professional advice: If you’re unsure about the condition of your lawn or whether removing old sod is necessary, consider consulting a professional landscaper or lawn care expert. They can assess the situation and provide personalized recommendations based on your lawn’s specific needs.
By thoroughly assessing the signs and condition of your lawn, you can make an informed decision regarding the removal of old sod. Remember, removing old sod is a proactive step towards achieving a healthier and more vibrant lawn, but it’s critical to assess whether it’s the best course of action for your particular circumstance. The next part will delve into the preparations required before initiating the sod removal process.
Preparing for Sod Removal
Before you plan the process of removing old sod, proper preparation is key to ensuring a smooth and successful experience. Taking the necessary tools and materials and making necessary notifications will set the stage for effective sod removal.
A. Gather the necessary tools and materials:
- Sod cutter: Depending on your lawn size and personal preference, choose between a manual sod cutter or a gas-powered sod cutter. Renting one from a local equipment rental store is a cost-effective option.
- Shovel: Have both a square-nosed shovel and a round-point shovel on hand. They will be useful for various tasks, such as edging, cutting, and lifting sections of sod.
- Rake: A sturdy metal rake will help remove debris, loosen the soil, and prepare the ground for replanting.
- Compost: To enhance the soil’s quality and provide nutrients for the new grass, create or buy organic compost.
- Grass seeds: If you’re planning to seed the lawn after removing the old sod, select high-quality grass seeds suitable for your region and lawn conditions.
- Water source: Ensure you have a readily available source of water, such as sprinkler system or a garden hose, for watering the lawn during and after the sod removal process.
B. Notify utility companies:
Before digging or operating any machinery, it is crucial to notify utility companies to mark the locations of underground utilities such as gas lines, water pipes, and electrical cables. This precaution will help prevent any damage or accidents during the sod removal process.
C. Prepare the lawn for sod removal:
- Thoroughly water the lawn: A day or two before starting the sod removal process, deeply water the lawn to soften the soil and make it easier to cut and lift the sod.
- Remove obstacles: Clear the lawn of any obstacles, such as rocks, sticks, or toys, which could interfere with the sod cutter or pose safety risks during the removal process.
- Trim the grass: Trim the existing grass to a manageable height using a lawnmower or trimmer. This will make it easier to remove the old sod and allow for a cleaner transition to the replanting phase.
By ensuring you have the necessary tools and materials and taking the proper steps to prepare your lawn, you’ll be well-equipped to tackle the sod removal process effectively. The next section has a step-by-step guide for removing old sod.
Step-by-Step Guide to Removing Old Sod
Now that you have properly prepared your lawn for sod removal, it’s time to dive into the step-by-step process. By following these guidelines, you’ll be able to efficiently and effectively remove the old sod, clearing the way for a fresh start and healthy new grass.
A. Mark the areas to be removed:
Use spray paint or stakes and string to outline the areas where you plan to remove the old sod. By doing so, you can maintain your organization and make sure that you only take out the necessary sections.
B. Choose a sod removal method:
1. Sod cutter method:
- Adjust the blade height of the sod cutter according to the thickness of the sod.
- Starting at the edge of the marked area, push the sod cutter forward, cutting through the sod and a few inches of soil.
- Continue cutting parallel strips of sod until the entire marked area is covered.
- Roll up the cut strips of sod and remove them from the lawn.
2. Manual sod removal method:
- Make vertical cuts along the marked area with a square-nosed shovel, dividing it into manageable sections.
- Insert a round-point shovel or spade underneath the cut sections of sod, lifting and prying them loose.
- Roll up the lifted sections of sod and transfer them away from the lawn for disposal.
C. Dispose of or repurpose the old sod:
- If the old sod is in good condition and free from weeds or diseases, consider repurposing it for other landscaping projects or offering it to neighbors or community members who may find it useful.
- If the old sod is damaged or infested, dispose of it responsibly. Check local regulations for proper disposal methods, such as green waste bins or designated composting facilities.
D. Prepare the soil for replanting:
- Use a rake to remove any debris, rocks, or roots left behind after removing the old sod.
- Take the opportunity to amend the soil by adding organic compost. Spread a layer of compost over the exposed soil and rake it in evenly to improve soil fertility and structure.
E. Level the surface:
Use the backside of a garden rake or a leveling tool to smooth out any uneven areas on the soil surface. This will provide a more even base for replanting.
By following this step-by-step guide, you’ll successfully remove the old sod, leaving a clean and prepared surface for the next phase of replanting. In the next part, we will explore the essential steps for preparing the soil and choosing the right grass and planting method for your lawn restoration project.
Preparing the Soil for Replanting
After removing the old sod, it’s crucial to properly prepare the soil to create an ideal environment for new grass growth. This step is vital for establishing a strong root system and ensuring your lawn’s long-term health and beauty. In this section, we will outline the essential steps for soil preparation before replanting.
A. Perform a soil test:
- Determine the pH level, nutrient content, and soil’s overall health. Testing kits for soil are widely available at garden centers or through local extension offices.
- Follow the instructions provided with the soil test kit to obtain soil samples from various areas of your lawn.
- Send the soil samples to a reputable soil testing laboratory for analysis and receive a detailed report of the soil’s condition.
B. Amend the soil:
Based on the soil test results, make necessary amendments to address any deficiencies or imbalances in the soil.
Common amendments include:
- pH adjusting: If the soil pH is too acidic or alkaline, add lime to raise the pH or sulfur to lower it, respectively.
- Adding organic matter: Incorporate compost or well-rotted manure into the soil to improve its structure, drainage, and nutrient-holding capacity.
- Applying fertilizers: Based on the nutrient deficiencies identified in the soil test, apply a balanced fertilizer or specific nutrients as recommended.
C. Till the soil:
- Use a garden tiller or a hand cultivator to loosen the top soil (top few inches). This will break up compacted areas, improve aeration, and facilitate root penetration.
- Remove any debris that may have surfaced during tilling, such as rocks, roots, or other objects.
D. Level the surface:
Rake the soil to create a smooth and level surface. This will ensure an even distribution of grass seeds or sod during replanting.
E. Water the soil:
Before replanting, thoroughly water the prepared soil. Moistening the soil will help settle it and create an optimal environment for seed germination or sod establishment.
Properly preparing the soil sets the stage for successful grass establishment and growth. You’ll provide your new grass with the best possible start by performing a soil test, amending the soil as necessary, tilling, leveling, and ensuring adequate moisture. In the next part, we will guide you through the process of choosing the right grass and the most suitable planting method for your lawn.
Choosing the Right Grass and Planting Method
Selecting the appropriate grass variety and planting method is crucial for achieving a thriving and resilient lawn. Factors such as climate, soil conditions, sunlight exposure, and personal preferences should guide your decision.
A. Consider your region and climate:
- Research the well-suited grass varieties for your specific geographic region and climate. Consider factors such as temperature ranges, rainfall patterns, and seasonal variations.
- Consult with local gardening experts, turf specialists, or your local extension office to get recommendations on the best grass varieties for your area.
B. Evaluate soil and sunlight conditions:
- Determine the soil type and its drainage characteristics. Different grass species have varying soil preferences, such as sandy, loamy, or clay soils.
- Assess the amount of sunlight your lawn receives throughout the day. Some grass types thrive in full sun, while others tolerate shade better.
C. Select the right grass variety:
- Cool-season grasses: If you live in a region with colder winters and milder summers, consider cool-season grasses such as Kentucky bluegrass, tall fescue, or perennial ryegrass.
- Warm-season grasses: For areas with hot summers and mild winters, warm-season grasses like Bermuda grass, Zoysia grass, or St. Augustine grass are suitable choices.
- Transitional zone: In regions with a mix of cool and warm climates, you may opt for grass varieties adaptable to the transitional zone, such as fine fescue blends or certain hybrid grasses.
D. Determine the planting method:
- Seeding: Seeding is a cost-effective method suitable for larger areas. Prepare the soil, spread the grass seeds evenly, and lightly rake them into the soil. Follow the recommended seeding rates and watering schedule for the chosen grass variety.
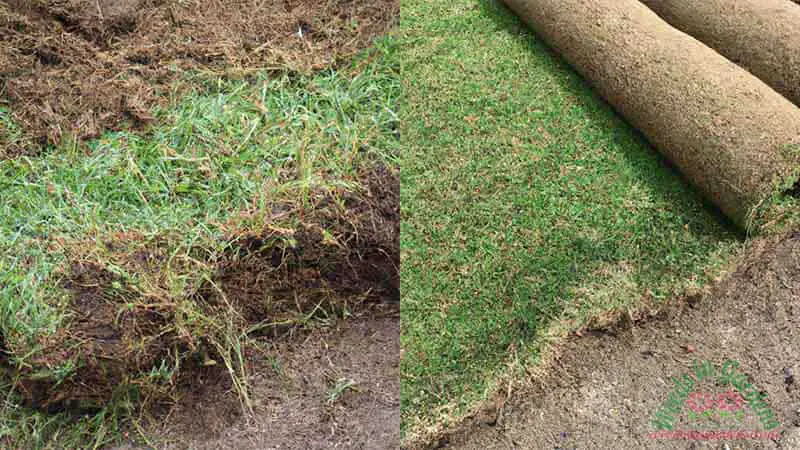
- Sodding: Sodding provides instant results and is ideal for smaller areas or when time is of the essence. Lay rolls of sod tightly on the prepared soil, ensuring no gaps or overlaps. Water the sod thoroughly immediately after installation.
- Sprigs/Plugs: Sprigs or plugs are small grass sections with roots that are planted at regular intervals. This method is effective for warm-season grasses and helps achieve complete coverage over time.
E. Follow proper planting guidelines:
- Seed planting: Follow the recommended seeding depth and spacing instructions provided for the chosen grass variety. Keep the seeded area consistently moist during germination and establishment.
- Sod installation: Water the soil before laying the sod to provide moisture. Start at one edge and unroll the sod, firmly pressing it into the soil. Stagger the seams to ensure a seamless appearance.
- Sprigs/Plugs planting: Dig holes or use a plugger to create evenly spaced holes in the soil. Insert the sprigs or plugs into the holes, ensuring they are firmly in contact with the soil.
By considering your region’s climate, soil and sunlight conditions, and selecting the appropriate grass variety and planting method, you can set the stage for a successful lawn restoration project. In the next part, we will guide you through the essential steps for replanting and post-planting care to ensure the healthy establishment of your new grass.
Replanting and Post-Planting Care
Once you have chosen the right grass variety and planting method, it’s time to replant your lawn and provide the necessary care for the newly established grass. This section will guide you through the essential steps of replanting and post-planting care to ensure the healthy establishment of your new grass.
A. Replanting the grass:
1. Seed planting:
- Follow the recommended seeding rates for the selected grass variety.
- Evenly spread the grass seeds over the prepared soil, ensuring thorough coverage.
- To encourage good seed-to-soil contact, lightly rake the seeds into the ground..
2. Sod installation:
- Start laying the sod from one edge of the prepared area, ensuring tight and seamless placement.
- Stagger the seams of the sod rolls for a more natural appearance.
- Use a roller or tamp down the sod to ensure good contact with the soil.
B. Watering:
- After replanting, water the newly planted grass thoroughly to settle the soil and promote root establishment.
- Keep the soil consistently moist during the initial weeks until the grass becomes established.
- Water deeply and sparingly, allowing the soil to slightly dry out in between applications to promote the growth of deep roots.
C. Mowing:
- Wait until the grass reaches the recommended mowing height for the specific variety before the first mowing.
- Adjust the mower blade height as necessary, typically around one-third of the grass blade’s length.
- Regularly mow the lawn to maintain the recommended height, avoiding cutting more than one-third of the grass height at a time.
D. Fertilization:
- Wait until the new grass has become established before applying fertilizer, usually after the first or second mowing.
- Choose a high-quality, slow-release fertilizer specifically formulated for the grass type and follow the recommended application rates.
- Apply the fertilizer evenly, taking care to avoid runoff onto non-target areas.
E. Weed control:
- Regularly inspect the lawn for weed growth and promptly address any emerging weeds.
- Use appropriate weed control methods, such as hand-pulling, spot treatments, or herbicides labeled for use on the specific grass variety.
- Follow the recommended timing and application instructions to effectively control weeds without harming the newly planted grass.
F. Regular maintenance:
- Provide regular irrigation to the lawn, ensuring it receives adequate moisture for healthy growth.
- Perform routine lawn care practices such as aeration, dethatching, and overseeding, as recommended for your grass type and climate.
- Maintain good lawn hygiene by regularly removing debris, such as leaves and fallen branches.
Following these replanting and post-planting care guidelines will maximize the chances of successful grass establishment and achieve a lush and healthy lawn. Keep in mind that it might take a few weeks for the new grass to establish fully. Your lawn will thrive for many years if you give it the right attention and maintenance.
Conclusion
Removing old sod and replanting a lawn can be a rewarding process that rejuvenates your outdoor space and creates a vibrant and healthy landscape. You can successfully complete the sod removal procedure and guarantee a successful replanting by following the detailed instructions provided in this article.
We began by assessing the need to remove old sod and understanding the factors that might influence this decision. Proper preparation for sod removal, including gathering the necessary tools and materials and notifying utility companies, was emphasized to ensure a smooth process.
Next, we delved into the step-by-step guide for removing old sod, covering different methods such as using a sod cutter or manual removal techniques. Disposing of or repurposing the old sod responsibly was also highlighted.
Preparing the soil for replanting was discussed in detail, emphasizing the importance of performing a soil test, amending the soil as needed, and creating an optimal surface for the new grass.
Choosing the right grass variety and planting method is crucial for successful lawn restoration. Factors such as climate, soil conditions, and sunlight exposure should guide your decision-making process.
Replanting and post-planting care were addressed to ensure the healthy establishment of the newly planted grass. Proper watering, mowing, fertilization, weed control, and regular maintenance were highlighted as essential elements of post-planting care.
In conclusion, removing old sod and replanting a lawn requires careful planning, preparation, and diligent execution. You can create a lush, vibrant, and thriving lawn that improves the beauty of your outdoor area by adhering to the tips offered in this article. Enjoy the process and the rewards of your hard work as you watch your new grass flourish and transform your landscape.